Drastically Reduce your CSS File Size with PurifyCSS and webpack
There's no use of including CSS in your project if it's not being used across any of your site. Why include Bootstrap's hundred-something classes if you're only making use of its grid?
Doing so creates a bloated CSS file that slows your site down and in return affects your pagespeed scores and SEO ranking. Google now factors mobile sites' SEO ranking based on page speed As a result, we'll want to ensure we're only adding the exact classes required for our site to function, and we can do this using no other than: PurifyCSS
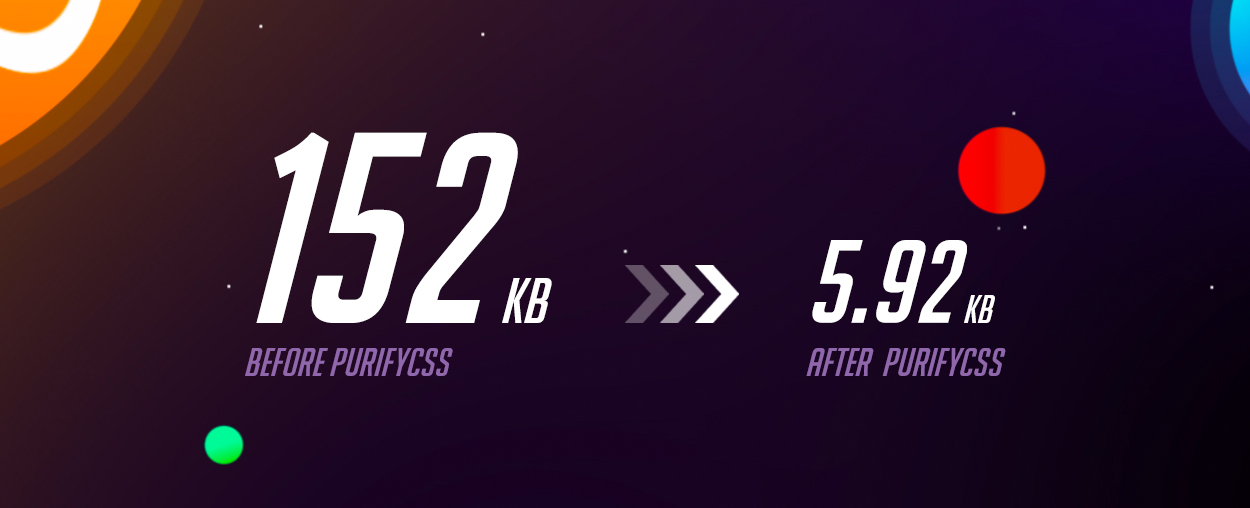
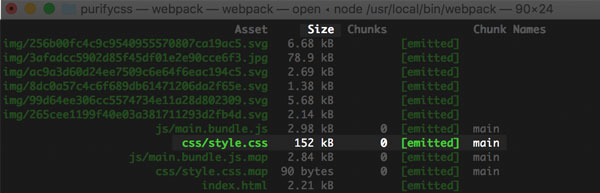
Before PurifyCSS:
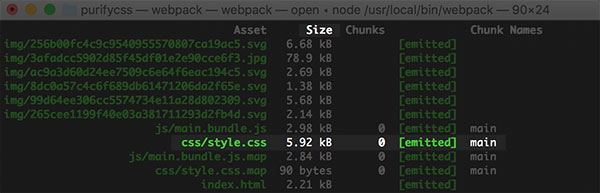
After PurifyCSS:
PurifyCSS is a command-line tool "that takes content (HTML/JS/PHP/etc) and CSS, and returns only the used CSS."
Let's say we have two files: index.html and style.css. If we're only making use of Bootstrap's grid, we'll want to make sure style.css only contains Bootstrap's grid classes and nothing else. We could hand-pick the grid classes out manually, but that would be an extremely time consuming process, so instead, we'll use PurifyCSS to hand-pick those classes automatically.
Project Setup
Now before we begin, I should mention PurifyCSS has its own set of command-line functions that'll purify your CSS files on an as-needed basis, however, I'd rather have my CSS purified automatically whenever a file is changed, so I'm going to use webpack to watch for any changes instead.
Let's start off by setting up a basic webpack template that is responsible for managing our HTML, CSS, and JavaScript.
First, clone the project template:
git clone https://github.com/chriscourses/webpack-html-boilerplate.git
Second, cd into the new directory and install any project dependencies with yarn or npm:
cd webpack-html-boilerplate;
npm install
Third, run webpack (make sure you have webpack installed globally to do this). Our project should open up automatically in the browser:

Now that we have a boilerplate up and running, let's integrate PurifyCSS into our project.
Integrate PurifyCSS with Webpack
You may have noticed that we already have a basic SCSS file being used within our project, style.scss:
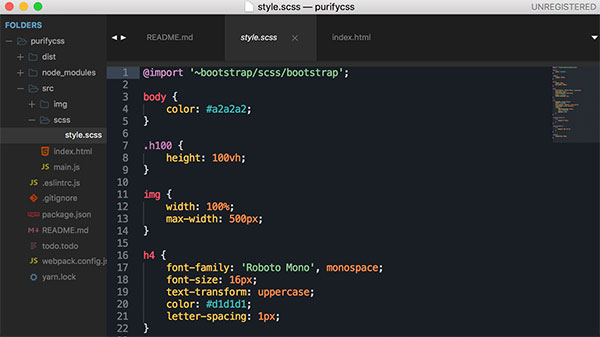
This file is importing Bootstrap's CSS (152kb large), which in turn has it's classes being used in index.html:
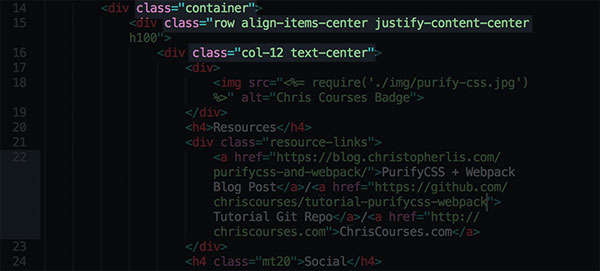
Let's utilize PurifyCSS to only add the classes being used within index.html into our outputted style.css file in /dist.
Install Dependencies
Before we're able to make use of PurifyCSS, we first need to install it along with some associated packages:
npm install purifycss-webpack purify-css glob-all --save-dev
Update webpack.config.js
With the dependencies installed, we'll need to update our webpack config at webpack.config.js (this what connects PurifyCSS to our actual project):
const BrowserSyncPlugin = require('browser-sync-webpack-plugin')
const ExtractTextPlugin = require('extract-text-webpack-plugin')
const HtmlWebpackPlugin = require('html-webpack-plugin')

const PurifyCSSPlugin = require('purifycss-webpack')
const path = require('path')
const glob = require('glob-all')

module.exports = {
  entry: './src/main.js',
  output: {
    path: __dirname + '/dist/',
    filename: 'js/main.bundle.js'
  },
  module: {
    loaders: [
      {
        test: /\.scss$/,
        use: ExtractTextPlugin.extract({
          fallback: 'style-loader',
          use: 'css-loader!sass-loader'
        })
      },

      {
        test: /\.(png|jpg|gif|svg)$/,
        use: [
          {
            loader: 'file-loader',
            options: {
              outputPath: 'img'
            }
          }
        ]
      }
    ]
  },
  plugins: [
    new ExtractTextPlugin('css/style.css'),
    new BrowserSyncPlugin({
      host: 'localhost',
      port: 3000,
      server: { baseDir: ['dist'] },
      files: ['./dist/*', '**/*.html']
    }),
    new HtmlWebpackPlugin({
      title: 'My App',
      template: 'src/index.html',
      filename: 'index.html'
    }),
    new PurifyCSSPlugin({
      paths: glob.sync([
        path.join(__dirname, 'src/*.html'),
        path.join(__dirname, 'src/*.js')
      ]),
      minimize: true,
      purifyOptions: {
        whitelist: []
      }
    })
  ],
  watch: true,
  devtool: 'source-map'
}
We're pulling in the recently downloaded project dependencies on lines 5-7, then telling webpack to make use of PurifyCSS by adding its webpack loader code to our plugins property on lines 51-60.
Run webpack, and voila, you should see that PurifyCSS has stripped out all of the unused CSS with our page styling remaining intact:

Declaring Additional Paths
In order for this plugin to work, its required to specify what paths should be searched so that any CSS classes within them will be included in our final style.css file.
Here you can see that we're telling webpack to look through all files that end with a .html or .js extension within the src directory:
paths: glob.sync([
  path.join(__dirname, 'src/*.html'),
  path.join(__dirname, 'src/*.js')
])
glob-all is a node module that will allow us to provide directory patterns using the \* symbol, while path is a module that'll help create a full path to whatever directories we'd like to search through.
Again, we're telling PurifyCSS to search for all CSS classes within .html and .js files—if you'd like to search through additional files, let's say PHP files, you'd add an additional path for PurifyCSS to search through:
paths: glob.sync([
  path.join(__dirname, 'src/*.html'),
  path.join(__dirname, 'src/*.js'),
  path.join(__dirname, '**/*.php')
  // searches all directories for all files that end with .php
])
Whitelist Classes
I'm going to skip over the minimize property (minimizes your CSS after purification) to focus on the whitelist property instead:
new PurifyCSSPlugin({
  paths: glob.sync([
    path.join(__dirname, 'src/*.html'),
    path.join(__dirname, 'src/*.js')
  ]),
  minimize: true,
  purifyOptions: {
    whitelist: []
  }
})
Adding values to the whitelist property array ensures that any classes that might not be caught by PurifyCSS, are indeed monitored and added to our end CSS file. For instance, if you're using WordPress, it's common you'll want to make use of some sort of plugin within your theme. Since these plugins are located in a completely different directory with an unpredictable directory structure, we have no way for PurifyCSS to accurately watch for changes within them. As a result, we can update our whitelist array to watch for any classes that PurifyCSS might've missed.
Here's an actual example of a PurifyCSS config within a WordPress project I've been working on:
new PurifyCSSPlugin({
  paths: glob.sync([
    path.join(__dirname, '*.php'),
    path.join(__dirname, 'templates/*.php'),
    path.join(__dirname, 'templates/partials/*.php'),
    path.join(__dirname, 'src/*.js')
  ]),
  minimize: true,
  purifyOptions: {
    whitelist: [
      '*gform_fields*',
      '*gform*',
      '*gfield*',
      '*svg*',
      '*alignright*',
      '*validation*',
      '*fa-facebook*',
      '*fa-twitter*',
      '*fa-linkedin*',
      '*fa-youtube*',
      '*fa-instagram*',
      '*fa-plus*',
      '*slick*',
      '*mw-full*'
    ]
  }
})
Essentially, any CSS class that isn't taking effect probably isn't being monitored by PurifyCSS. As a result, you have two options:
- Ensure PurifyCSS is looking for classes within a particular file using the
pathsproperty - Tell PurifyCSS to always look for a particular class using the
whitelistproperty
Try to keep the amount of whitelisted classes to a minimum and only use if encountering an edge case such as pulling in HTML via WordPress plugins—doing otherwise will produce unnecessary bloat to your resultant CSS file.
Conclusion
To summarize, to utilize PurifyCSS's file shrinking wonders, you'll want perform the following:
- Install PurifyCSS dependencies
- Integrate PurifyCSS into webpack
- Declare what paths and files you want to monitor for CSS classes
- Add any classes not being tracked to your whitelist config
With that being said, you should now have a basic grasp on why you'd want to use PurifyCSS and how to integrate it into your project. For additional PurifyCSS information, check out the PurifyCSS and purifycss-webpack git repos.
Any questions or post edits? Leave a question on the forum. For more Chris Courses related updates, follow me on Twitter at @christopher4lis.